How to add an Image Slider to Your Blogger Blog
Last updated: 4 December 2015.
We have a great question this week from Kaina! All you Blogger folks listen up, because this one is just for you!
I was just wondering since I have a blogger blog do you know of any good picture sliders I could find or the process in which to make one? I would appreciate it tons!!Kaina
To make the image slider work, you need to add some extra files to your site. We need to add one or two JavaScript files and one CSS file.
Step 1: Add the jQuery library (if you don’t already have it).
First, you need to figure out if you need to include jQuery or not. The easiest way to do that is to visit your block, right click, select “View Page Source” and do a CTRL+F search for jquery.
If you get a result, then you probably do have jQuery on your blog.
If you DO NOT get a result, then you don’t have jQuery and you need to add it.
If you DO NOT get a result, then you don’t have jQuery and you need to add it.
Skip to the next step if you did in fact get results from the above check.
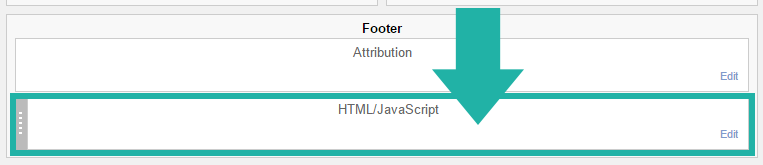
Add a new HTML/JavaScript gadget to your footer in your Blogger layout (at the very bottom).
Paste this inside of the gadget text box:
<script src="https://ajax.googleapis.com/ajax/libs/jquery/1.11.3/jquery.min.js"></script>
Step 2: Add the Nivo Slider JavaScript to your site.
Next, we’re going to add the Nivo Slider file to your site. This is also going to be added in the footer, so if you followed step #1, you can use the same gadget. Otherwise, add a new HTML/JavaScript gadget to the footer of your site (at the very bottom).
Then paste this inside your gadget:
<script src="https://cdnjs.cloudflare.com/ajax/libs/jquery-nivoslider/3.2/jquery.nivo.slider.min.js"></script>
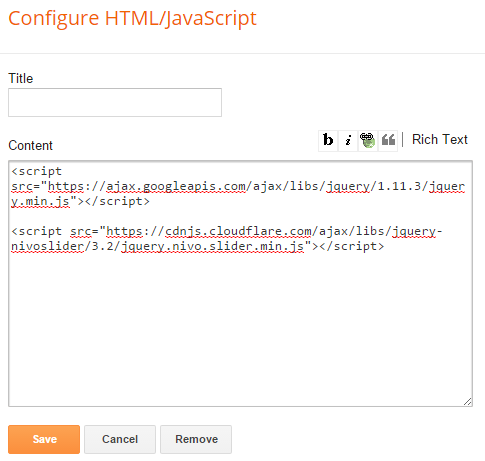
Here’s what my gadget looks like with thte jQuery and Nivo Slider script:
Step 3: Nivo Slider script initiation.
Now we need to add a custom bit of JavaScript to tell our site, “Hey, start that image slider please!”
The snippet we’re working with can be placed at the end of the gadget we used before. It looks like this:
<script type="text/javascript">
$(window).load(function() {
    $('#ng-nivoslider').nivoSlider();
});
</script>
So go ahead and throw that into the gadget. It must be below everything else.
Step 4: Add the Nivo CSS file.
This part involves digging through some code, but it’s not that bad—I promise.
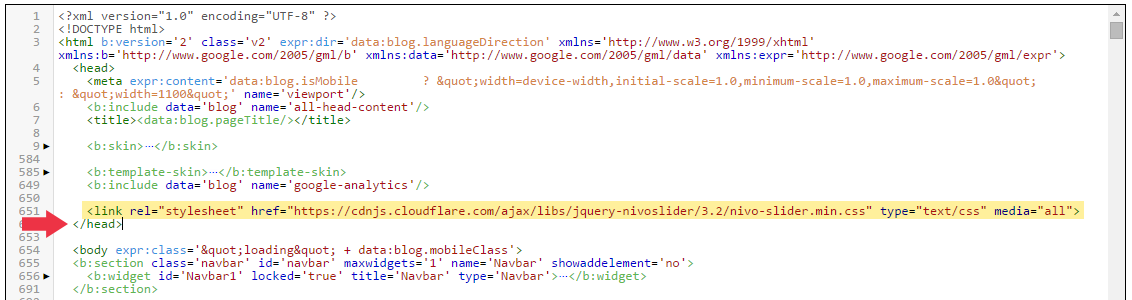
Inside Blogger, go to Template > Edit HTML. This brings you to the scary template code page. Luckily you just need to find one line near the top. It looks like this:
</head>
Again, it should be very near the top.
Then, paste this directly above it:
<link rel="stylesheet" href="https://cdnjs.cloudflare.com/ajax/libs/jquery-nivoslider/3.2/nivo-slider.min.css" type="text/css" media="all" />
Step 5: Add Images to the Slider
So at this point we have the slider code on the page, but no actual slider! Let’s add some images.
Here’s the main code you want to use for images:
<div id="ng-nivoslider" class="nivoSlider">

 <a href="URL TO LINK TO"><img src="IMAGE URL" alt="DESCRIPTION OF IMAGE" /></a>
 <a href="URL TO LINK TO"><img src="IMAGE URL" alt="DESCRIPTION OF IMAGE" /></a>
 <a href="URL TO LINK TO"><img src="IMAGE URL" alt="DESCRIPTION OF IMAGE" /></a>

</div>
See the three repeated lines in the middle? Those are the ones you want to edit. You can also add more if you want more than three images in your slider. Be sure to replace each piece of capitalized text with what you need. A final example might look like this:
href="URL TO LINK TO"— Enter the URL you want people to go to when they click the image.src="IMAGE URL"— URL for the image.alt="DESCRIPTION OF IMAGE"— In a few words, describe the image. (If there’s text on the image, type it out.)
<div id="ng-nivoslider" class="nivoSlider">

 <a href="https://www.nosegraze.com/black-city-by-elizabeth-richards/"><img src="https://www.nosegraze.com/wp-content/uploads/2012/11/black-city-graphic-step-6.jpg" alt="Black City by Elizabeth Richards" /></a>
 <a href="https://www.nosegraze.com/beautiful-disaster-by-jamie-mcguire/"><img src="https://www.nosegraze.com/wp-content/uploads/2012/08/beautiful-disaster-exception.jpg" alt="Beautiful Disaster by Jamie McGuire" /></a>

</div>
Once you have your final code, you just need to add it as a new HTML/JavaScript gadget. Create a new gadget (don’t use the old one!) and place it wherever you want on your blog.

Updating the slider with new images.
If you need to update the image slider at a later date, simply go back and edit that HTML gadget. You can remove old banners:
<a href="https://www.nosegraze.com/black-city-by-elizabeth-richards/"><img src="https://www.nosegraze.com/wp-content/uploads/2012/11/black-city-graphic-step-6.jpg" alt="Black City by Elizabeth Richards" /></a>
And add in new ones with different image URLs.
Just don’t touch the code at the start of the gadget:
<div id="ng-nivoslider" class="nivoSlider">
or at the end:
</div>
Those lines need to remain in tact for the slider to work.
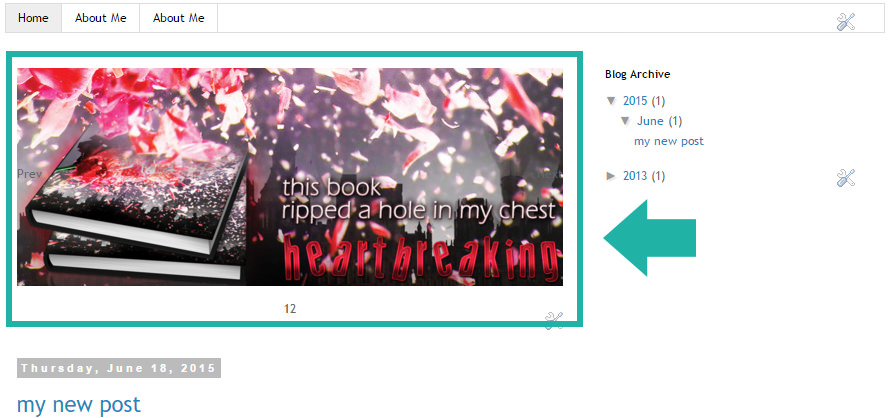
Here’s how it looks!
Here’s an example of how the Nivo Slider will look on your blog! This is a screenshot of my horrible, boring, test Blogger blog, but only look at the image slider, LOL!
Comments
Post a Comment