How to Create Your Own Social Media Icons
I’m going to walk you through how to create your own social media icons for your blog. You can create icons that match your design, even if just by using the colours in your palette. 
Requirements
- Photoshop: I suppose this isn’t really required but my tutorial will be using Photoshop. However, similar results can always be achieved in different programs. But you may not be able to follow my instructionsexactly.
- Internet access: Good news! If you’re reading this, you have it!
Step #1: Collect your icons
The first step is to collect the basic, raw, social media icons. By that I mean only the site logo without any background or design elements.
Decide which sites you want to make icons for, then download the icons. I personally use IconFinder for all my icon searches. You can search for the social media site you want (i.e. “twitter”), set the price to “Free”, and find a raw icon to download.
Example search:

To download the image, find a large copy (maybe 256×256 pixels or 64×64 pixels) and download the PNG version of the icon. It’s always better to start with large icons because you can always make them smaller at the end of the project. But if you start out too small, you can’t make them bigger!
So save the file to your computer, then repeat the process for all the sites you need icons for.
Step #2: Set up your Photoshop document
The next step is to create the background for the icons. I usually like to keep these pretty simple and just match the colours of the site I’m working with, but you can take whatever approach you want.
Open up Photoshop and create a large, new document. The document should be slightly larger than the size of the icons you downloaded. So if you downloaded the 256×256 icon, consider creating a document that’s somewhere between 260×260 and 300×300. Ultimately the size doesn’t matter because you can always make things smaller to fit.
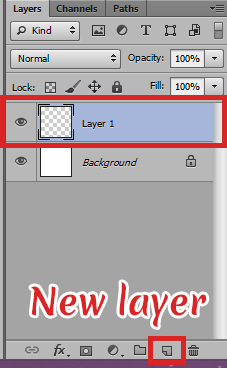
Next, create a new layer so that you’re not working on the “Background” layer.
Step #3: Create a simple background
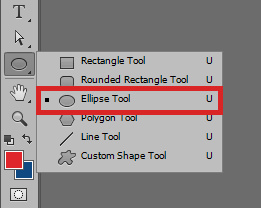
Next we can start by creating a simple, circular background for the icon to sit on. In the toolbar, switch to the Ellipse Tool. We’re going to use this to create a circle.
After activating the ellipse tool, click on the top colour in the toolbar (in the screenshot to the right, that would be the red colour) to open the colour palette. Select the colour you want your circular background to be. Don’t worry, you can change this later!
Next, look at the top bar in Photoshop and make sure your ellipse tool is set toShape. By setting it to shape (instead of “path” or “pixels”) you will have a coloured background and be able to resize the circle later.
Then, next to the “Shape” dropdown, click the “Fill” colour and set it to the colour you selected from the palette (it should appear under “Recently used colours”).

Finally, you’re ready!
Creating the circle
Move your cursor into the center of the document. Click and start dragging your cursor outwards. As you do so, hold down “Shift” and “Alt” together. Holding down “Shift” will cause your circle to actually be a circle (instead of an oval). Holding “Alt” will cause the circle to be created from the center of your cursor (I find this easier). When you’re happy with your circle, release the mouse click to set it.
Centering the circle
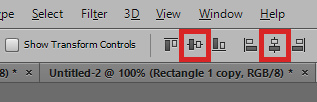
Sometimes your circle still won’t be perfectly center. To center it automatically, hit CTRL+A (or Apple+A on a Mac) to select all. Then switch to the Move Tool by hitting “V”. Then find the alignment options in the top toolbar. You can click each of the middle icons to align the circle vertically and horizontally.
Progress update
So here’s what my document looks like so far:

Now let’s put an icon in there!
Step #4: Add the icons
Next we’re going to put an icon in there! So grab one of your icons and paste it into the document in a new layer. Then resize it if necessary to fit inside the circle.

If you need to change the colour of the icon, you can easily do that. In the layer panel, make sure you have the icon selected. Then click the “Lock transparent pixels” icon.
Then set the foreground colour to the colour you want to change it to. Then hold the ALT key while you press Delete to apply the colour.
Step #5: Saving your icons
Make sure you repeat the same steps for adding all your other icons. Then you can save them!
First, you want to crop your document so that the circle goes all the way to the edges and that there’s no extra space. To do this, hit “C” on your keyboard to switch to the Crop Tool. Then drag the tool until so that the circle is right up against the edges, as shown below:
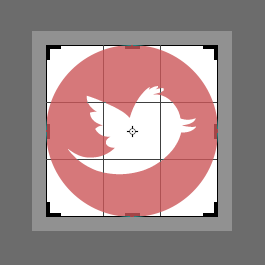
Then hit “Enter” to apply the crop.
Next, hide the white background layer so that your icons are transparent. Then go to File » Save for Web to start saving. On this screen you can resize your icons if necessary. I usually pick somewhere between 35 and 45 pixels for each icon, but you can play with it! Then just click “Save” when you’re done.
Rinse and repeat for each icon.
You’re done!
Check out my final result:
Get creative!
My tutorial focuses on using a simple circle for a background, but you can experiment! You can use different shapes or you can even experiment withbrushes. There are no limits!
Example using a paint brush instead of a circle shape
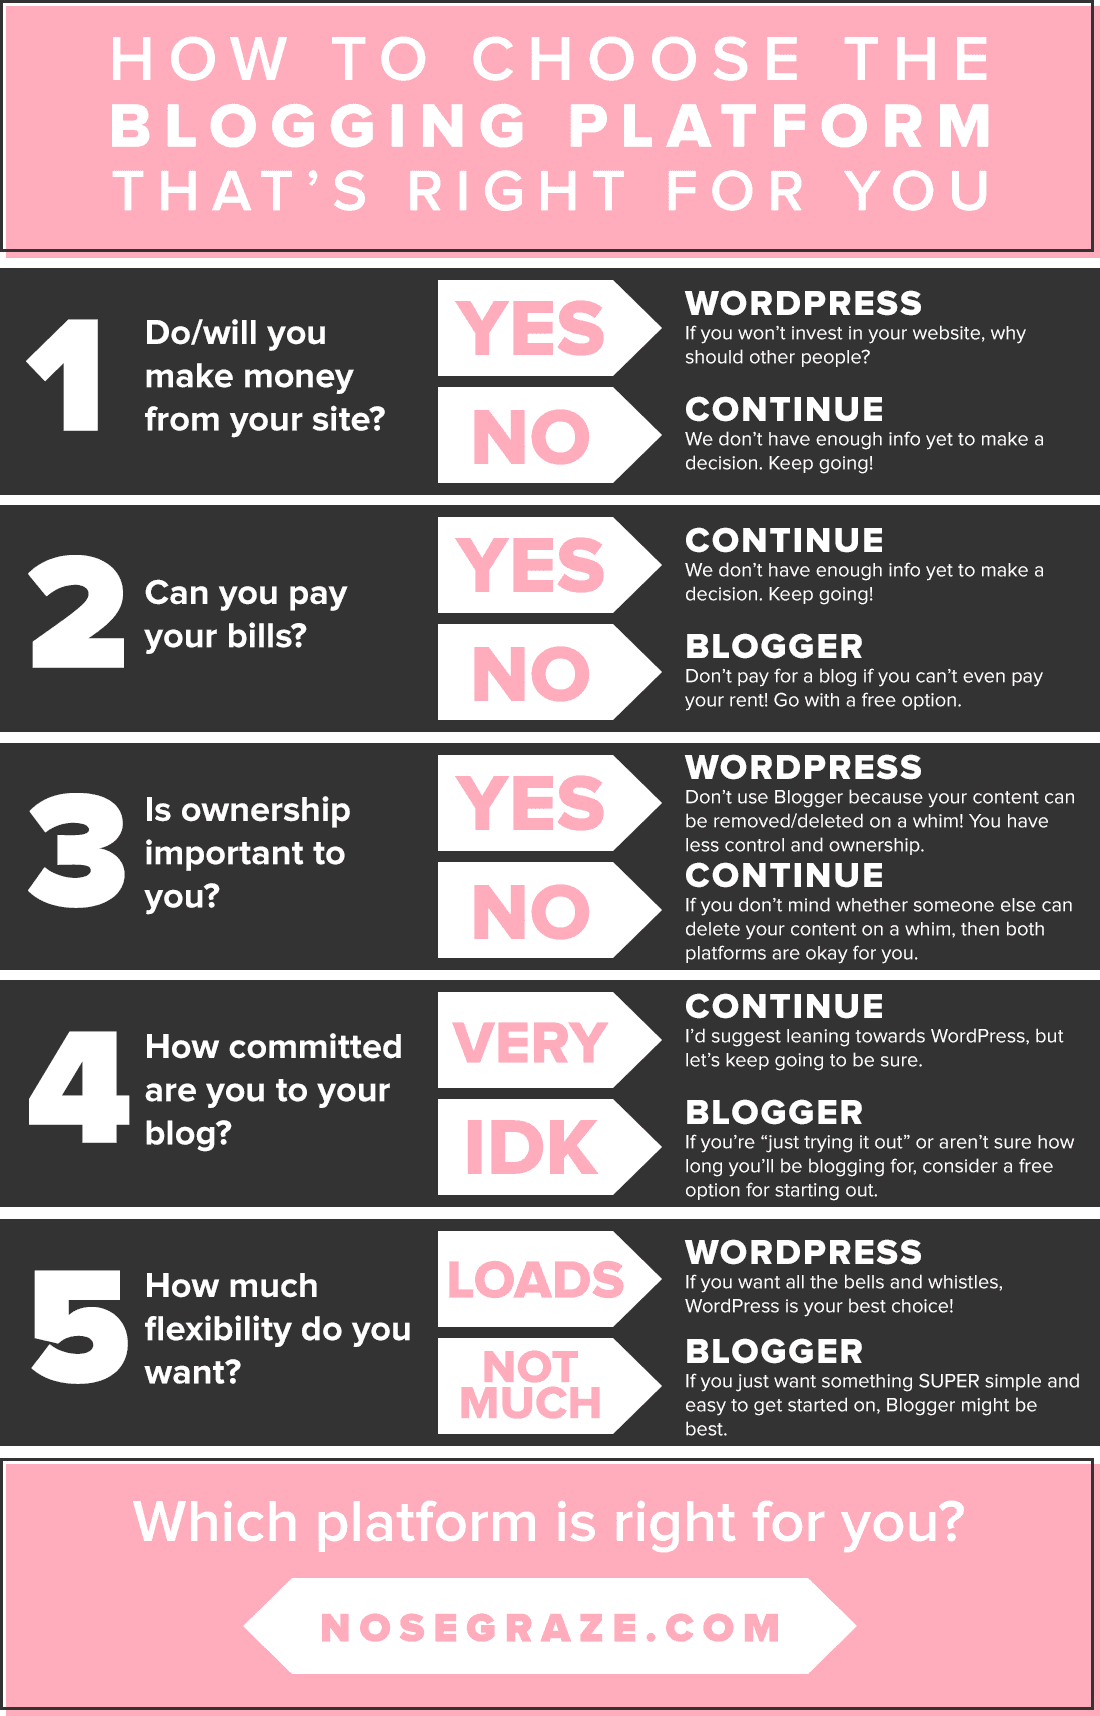
Let the Blogger vs WordPress war begin! 
Seriously though. Choosing the right platform is hard. And while I’m a ridiculously strong advocate of WordPress, I accept that it might not be the right choice for everyone. So today we’re going to figure out which platform is best for you.
Keep in mind that choosing a platform isn’t a decision you have to make for life. Sometimes it makes most sense to start out on one platform and transition to another somewhere down the line. But we’ll get into that!
Free platforms: Blogger and WordPress.com
There are two free platforms that I recommend:
- Blogger
- WordPress.com
I usually recommend Blogger over WordPress.com because Blogger has fewer restrictions, especially when it comes to custom themes. But ultimately, both platforms are fine choices.
Paid platform: WordPress.org
The paid platform we’ll be discussing is WordPress.org. This is when you rent your own hosting space and install WordPress on your own server, instead of being hosted for free by WordPress.com.
There are other paid platforms like Squarespace, but I’m not going to cover them in this post since it’s not something I’d personally recommend over WordPress.
What’s the difference between these platforms?
| Feature | Blogger | WordPress.com | WordPress.org |
|---|---|---|---|
| Free or paid | Free | Free – paid upgrades available | Paid |
| Ability to create custom themes | Yes | No – you can only modify existing ones | Yes |
| Extensions & add-ons | No | Some – paid | Many – free and paid |
| Freedom & control | No | No | Yes |
| Easy to take a break | Yes | Yes | If you take a break, you still have to keep paying. If you stop paying, your data can be deleted. |
| Advertising | Allowed | Not allowed | Allowed |
| Ease of set up | Very easy | Very easy | A bit more complex; you have to install WordPress |
What’s the difference between WordPress.com and WordPress.org?
A lot of people ask me what the difference is between these platforms, because it’s confusing! They’re both WordPress, but what’s the difference between .com and .org?
WordPress.com and WordPress.org both use the same core functionality: the WordPress platform. The difference is that when you use WordPress.com, your blog lives on Automattic’s servers (the company behind WordPress.com) for free. In order to create a safer environment, they disable certain features on the WordPress platform. You cannot upload custom themes or plugins and you cannot use JavaScript.
When you use WordPress.org, you pay to rent your own server and install WordPress there. Since you’re paying to host WordPress yourself, you do not get the “stripped down” version. There are no restrictions. You can upload custom plugins and themes and you can use JavaScript.
Let’s find out which is best!
Now that we have an idea of what the differences are, let’s dig a little deeper and figure out which platform is best for you.
Is this a business? INVEST in yourself!
If your website is your business and you make money from it, you should always go with WordPress.org. Self-hosted WordPress has the most options and the most flexibility. It will give you the most room for expansion.
But most importantly, if you won’t invest in your business, why should other people? Self-hosted WordPress is the most professional platform. If you’re taking the cheapest route possible, how will that look to your clients? If you want them to invest in you, you have to invest in yourself.
Can you pay your bills?
If you’re having any trouble paying your bills, do not use a paid platform! Adding another expense will add more stress in your life. And if you miss payments, you can lose your whole site. As soon as you stop paying for hosting, your web host has the right to delete all your content.
Having a self-hosted site is fantastic, but it’s not worth it if you’re struggling to make other payments.
How important is content ownership to you?
The difference between a free platform and a paid platform is freedom.
Free platforms have full control over your content
When you use a free platform, you’re putting that content on a server that someone else owns. Since someone else owns it, they have full rights to delete or change that content whenever they want.
- They can decide your blog is inappropriate and delete it.
- They can decide your blog is spammy because it has too many affiliate links or promo posts and delete it.
- They can decide that your blog isn’t in line with their terms of service and delete it.
There are MANY stories about people on the Blogger platform having their blogs removed for no reason or for vague “spam” reasons. Most of the time their blogs are eventually restored, but not always. And the fact is, Google (or WordPress.com) is fully within their rights to delete a blog for any reason. They do not have to restore it if they don’t want to.
You own your content on a paid platform
When you actually rent your own server space, that space is YOURS. Sure, there are still terms and conditions you have to follow, but they’re a lot less restricting.
For example, the WordPress.com Types of Blogs page says that “book tour blogs” are not allowed. These are blogs that often post “release day blitzes”, promotional posts, and giveaways. They’re not allowed because WordPress.com views them as advertisements, which are not allowed.
However, if you rent your own hosting space, the terms of service allow you a lot more freedom. In most cases, you can do anything on your site provided that it’s not illegal (hacking, illegal marketplace, child porn, etc.). Your content will not be deleted for vague reasons like “it’s spam” or “it’s too much advertising”.
And let’s face it, when you’re a paying customer, the company is more likely to do everything they can to keep your business. 
Where do you see your blog in two years?
How long will you be blogging for? Is this something you’re “just trying out for a while” or are you seriously committed to making this blog work in the long term? These questions will help you decide whether or not it’s worth it to go the paid route.
If you’re not sure if you’ll be sticking with blogging and you just want to try it out for a while, going the free route at first is the better option. This will give you time to get your toes wet and see if this is something you want to commit to.
But if you’re launching a business or starting a blog that you know you’ll stick with for years to come, then consider going for self-hosted WordPress. Most long-time bloggers find themselves wanting to upgrade to WordPress.org eventually, because objectively speaking, WP.org is the best platform. So if you see yourself heading in that direction eventually, why not do it now?
Do you want all the shiny buttons?
Blogger and WordPress.com are limited because they’re free platforms. When you go with a free platform, you only get so much. You get what you pay for.
WordPress.org has the most features. There are repositories full of thousands of free themes and plugins, and even more paid options outside of that. There are plugins for security, email opt-ins, anti-spam, comment platforms, content templates, e-commerce shops, and more.
If you like tons of features to help you optimize your workflow and organize your site, check out WordPress.org.
If you want a simple, minimalistic interface, consider Blogger. Blogger has fewer features, which objectively makes it less powerful. But there are some people who value super simple platforms because it makes them easier to navigate.
Which do you prefer? Features galore or simplicity?
Everyone has their own choice here, and it’s up to you to decide which you like most.
If in doubt, start out free!
If you’re feeling conflicted, I would encourage you to try a free option first. There’s nothing to lose! You could even sign up for a free Blogger blog, play around, and if you decide you want more you can switch to self-hosted WordPress straight away. But starting out free will allow you to play around and see if blogging is something you will stick with. If the time comes, you can always migrate from Blogger to WordPress—it’s not as hard as it seems!
Which platform will/did you choose? Blogger, WordPress.com, or WordPress.org? Why?
Coming up next in the how to start a blog series: how to find a good pre-made design.
Comments
Post a Comment