
The Novelist plugin helps authors build and manage their websites—specifically their collection of books. The plugin is ideal for people who aren’t super tech savvy and want to be able to update, maintain, and add books without worrying about formatting or screwing up layouts. Novelist handles all the formatting for you.
Installing the plugin
The Novelist plugin can be installed directly from the WordPress admin panel.
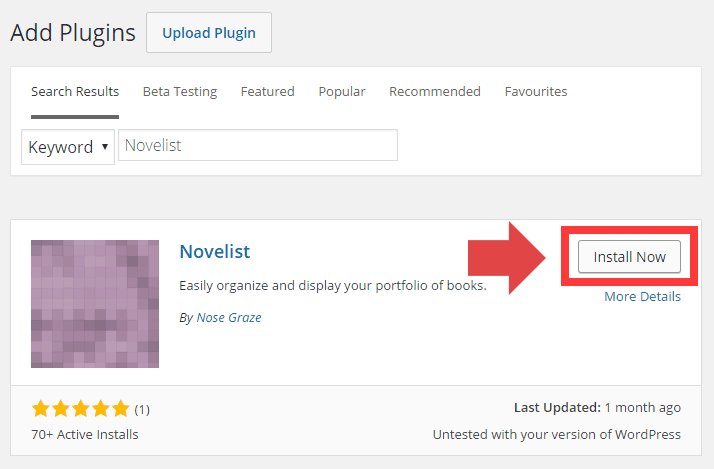
- Login to the wp-admin panel.
- Navigate to Plugins » Add New.
- Search for Novelist.
- Click to install the Novelist plugin.
- Click “Activate” to activate the plugin.
Configuring the book settings
Once installed, the plugin settings can be found in Books » Settings.
You don’t have to configure all of the settings right now, but there are two things you probably want to do right off the bat:
1) Set up the book fields you want to use
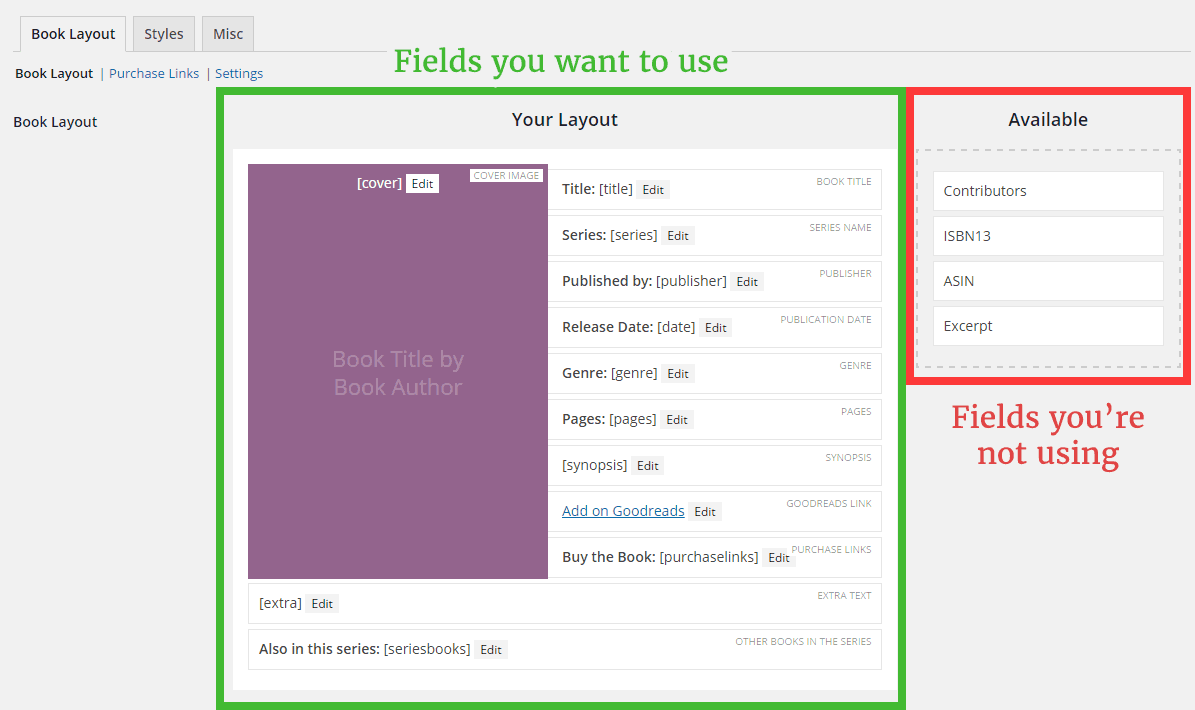
In the “Book Layout” area, drag all the fields you’re interested in using into the “Your Layout” area. Move any fields you won’t be using into the box on the right. You want to make sure you have all the fields you’re interested in activated before you start adding books.
For each field, you can click on the “Edit” button to configure the template associated with that field.
2) Configure your purchase sites
Click over to “Purchase Links” and set up all the retail sites you want to link to. Again, it will save you time if you set these up before you start adding all your books!
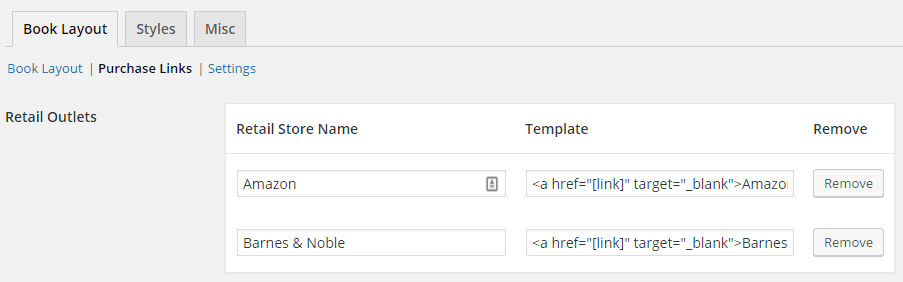
Each purchase link has a template associated with it like this:
<a href="[link]" target="_blank">Amazon</a>
That [link] is a placeholder for the actual purchase URL, which you’ll enter for each book separately.
Adding books
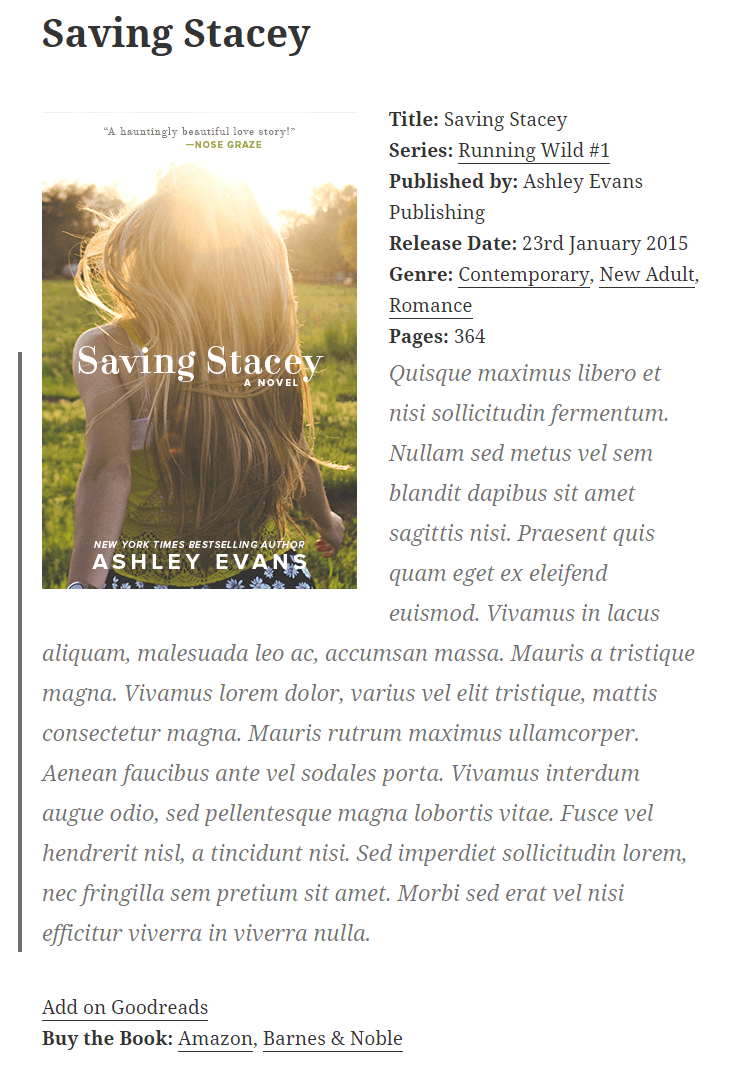
To add your first book, go to Books » Add New. Adding a book is as simple as filling out a form with the book information (the info you chose in the previous step!).
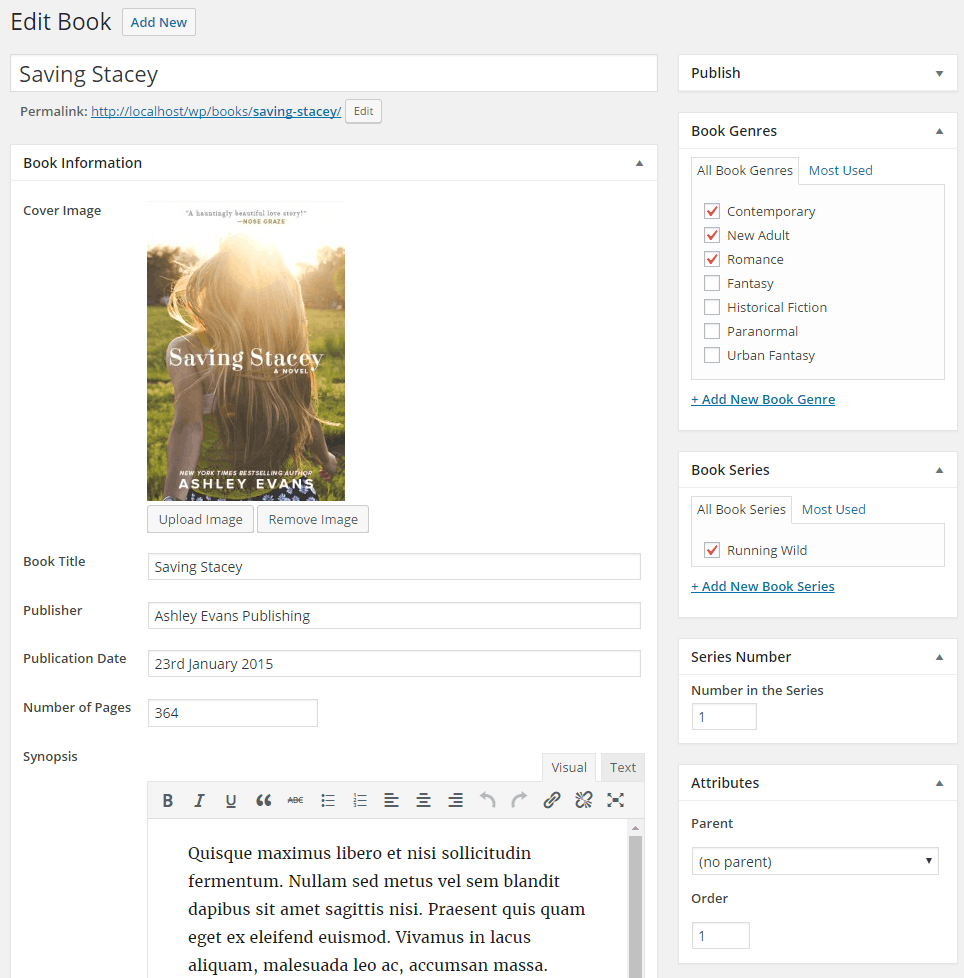
The “Publish” box in the top right allows you to save the book as a draft, publish it for everyone to see, or preview it first. When you preview or view the book, you’ll see that all the information has been formatted for you.
In a later post I’ll guide you through how a theme developer can create more advanced, custom layouts in themes they build for author clients.
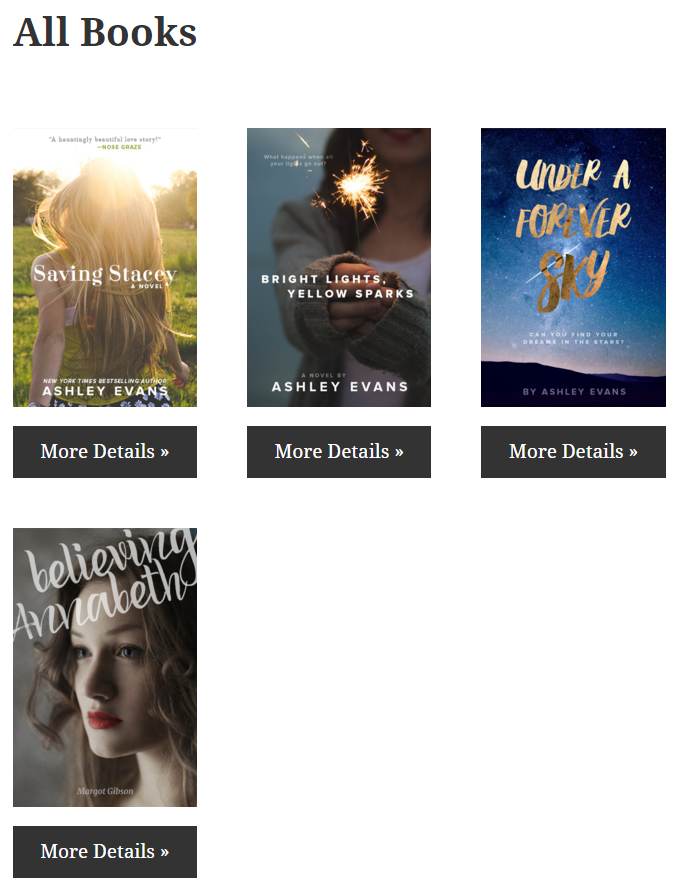
Setting up your “all books” page
A book archive is automatically set up at http://yoursite.com/books/, but Novelist also has options for creating your own page (as the one you see at /books/ may not be to your taste!).
To create a grid of your books, create a new page in WordPress (Pages » Add New), and use this Novelist shortcode: [novelist-books]
This shortcode also has a ton of extra parameters you can use to customize how it looks. Here are a few examples:
[novelist-books genre="Contemporary"]
Limits the results only to books with the genre “Contemporary”.
[novelist-books columns="3"]
Changes the number of columns per row to three (by default it’s four).
[novelist-books excerpt="true"]
Set the excerpt to “true” to show an excerpt from each book’s synopsis.
[novelist-books number="20"]
Show 20 books per page.
For a full list of available parameters and how to use them, check out the documentation for [novelist-books].
More information & tutorials
More documentation can be found at docs.novelistplugin.com.
This tutorial uses ActiveCampaign and Easy Digital Downloads. It can probably be achieved with other platforms, but my guide doesn’t reflect that.
On my new Novelist plugin website I wanted to send all new email subscribers a 10% off coupon code as a thank you for signing up.
The easy way to do this in Easy Digital Downloads is to create a new discount code that never expires and doesn’t have a use limit. Then send everyone the same discount code in your welcome email.
…But I didn’t want to do that.
Obviously there are problems with this method. The code isn’t unique and doesn’t have any usage limits, so it can easily be reused, shared with friends, and so on.
My Goal
- When a new person subscribes, trigger the code.
- Create a unique discount code specifically for this person. The code has one use only.
- Email that code to the new subscriber.
Step 1: Set up a new webhook in ActiveCampaign.
Go to “Automations” and create a new automation.
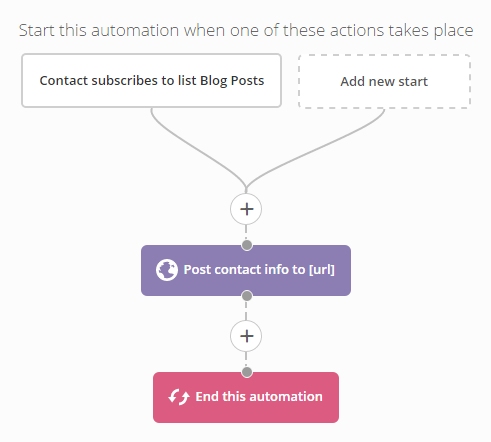
The trigger can be anything you want. I chose when someone subscribes to my blog post mailing list.
For your action, look under “Conditions & Workflow” and select “Webhook”. For the URL, enter this:
http://yoursite.com/?trigger-special-discount=true&discount-key=JkbYRHvWAoddmVUTK1u8RH8V
I’ve highlighted the stuff you need to change.
- Replace
yoursite.comwith your actual site URL where Easy Digital Downloads is installed. - Replace
JkbYRHvWAoddmVUTK1u8RH8Vwith a random string of numbers and letters. This is kind of like a password to help make sure that not just anyone can send stuff to this URL and trigger discount codes.
Step 2: Coding the WordPress plugin.
Now we create a WordPress plugin to actually listen at that URL and create the discount code.
Here’s the header for our file containing the plugin name and other information:
<?php
/**
 * Plugin Name: EDD - Discounts for Subscribers
 * Plugin URI: https://www.nosegraze.com
 * Description: Automatically email a discount code to new subscribers.
 * Version: 1.0
 * Author: Nose Graze
 * Author URI: https://www.nosegraze.com
 * License: GPL2
 *
 * @package edd-discounts-subscribers
 * @copyright Copyright (c) 2016, Nose Graze Ltd.
 * @license GPL2+
*/

// Exit if accessed directly
if ( ! defined( 'ABSPATH' ) ) {
 exit;
}
And here’s the actual function that makes the magic happen:
/**
 * Create and send 10% off coupon code when signing up for mailing list.
 *
 * @return void
 */
function ng_edd_discounts_subscribers_send_code() {
 if ( ! isset( $_GET['trigger-special-discount'] ) || ! isset( $_GET['discount-key'] ) || $_GET['discount-key'] != 'JkbYRHvWAoddmVUTK1u8RH8V' || ! function_exists( 'edd_store_discount' ) ) {
  return;
 }

 // Now check to make sure we got data from AC.
 if ( ! isset( $_POST['contact'] ) || ! isset( $_POST['contact']['email'] ) ) {
  return;
 }

 $contact = $_POST['contact'];
 $email   = wp_strip_all_tags( $contact['email'] );

 if ( ! is_email( $email ) ) {
  return;
 }

 global $wpdb;
 $discount_name = sprintf( '10%% off for %s', $email );

 $query   = "
        SELECT      *
        FROM        $wpdb->posts
        WHERE       $wpdb->posts.post_title LIKE '$discount_name%'
        AND         $wpdb->posts.post_type = 'edd_discount'
        ORDER BY    $wpdb->posts.post_title
";
 $results = $wpdb->get_results( $query );

 // Already created a discount for this email.
 if ( is_array( $results ) && count( $results ) ) {
  return;
 }

 $timestamp     = time();
 $numbers_array = str_split( $timestamp . rand( 10, 99 ) );
 $letters_array = array_combine( range( 1, 26 ), range( 'a', 'z' ) );
 $final_code    = '';

 foreach ( $numbers_array as $key => $value ) {
  $final_code .= $letters_array[ $value ];
 }

 $discount_args = array(
  'code'     => $final_code,
  'name'     => $discount_name,
  'status'   => 'active',
  'max'      => 1,
  'amount'   => 10,
  'type'     => 'percent',
  'use_once' => true,
 );

 edd_store_discount( $discount_args );

 $first_name = ( array_key_exists( 'first_name', $contact ) && ! empty( $contact['first_name'] ) ) ? $contact['first_name'] : 'there';

 $message = sprintf(
  "<p>Hey %s!</p>
  <p>Thanks so much for signing up for my list. As a thank you, here's a 10%% off discount code you can use on your next purchase in my shop:</p>
  <p><strong>%s</strong></p>
  <p>Enter this code at checkout to remove 10%% from your total.</p>
  <p>Have a great day!</p>
  <p>- Your Name</p>",
  esc_html( $first_name ),
  esc_html( $final_code )
 );

 $headers = array(
  'Content-Type: text/html; charset=UTF-8',
  'From: Your Name <noreply@yourwebsite.com>'
 );

 wp_mail( $email, 'Nose Graze 10% off Discount', $message, $headers );
}

add_action( 'init', 'ng_edd_discounts_subscribers_send_code' );
You will need to edit a few things:
- Make sure you enter your actual random key here:
$_GET['discount-key'] != 'JkbYRHvWAoddmVUTK1u8RH8V'. That should be the same as what you entered in the URL in the webhook. - This line:
$discount_name = sprintf( '10%% off for %s', $email );is the name of the discount code inside EDD (for admin use only). You can change it if you want (particularly if you’re using a different percentage). Make sure you keep the two percent signs there. Only one will actually show up. - You may choose to adjust some of the settings here:
$discount_args = array(
 'code'     => $final_code,
 'name'     => $discount_name,
 'status'   => 'active',
 'max'      => 1,
 'amount'   => 10,
 'type'     => 'percent',
 'use_once' => true,
);
maxis the maximum number of uses. I have it set to1.typecan be'percent'or'flat'amountis the discount number. I have it set to10, which means 10% when combined withtype.use_oncemeans it can only be used once per customer (if set totrue).
- You can edit the actual welcome message here:
$message = sprintf(
 "<p>Hey %s!</p>
 <p>Thanks so much for signing up for my list. As a thank you, here's a 10%% off discount code you can use on your next purchase in my shop:</p>
 <p><strong>%s</strong></p>
 <p>Enter this code at checkout to remove 10%% from your total.</p>
 <p>Have a great day!</p>
 <p>- Your Name</p>",
 esc_html( $first_name ),
 esc_html( $final_code )
);
Be careful with the quotes and whatnot. - You’ll want to change the from name and email here:
'From: Your Name <noreply@yourwebsite.com>' - And finally, the subject of the email here:
'10% off Discount'
Comments
Post a Comment